Create Vertical Lines in a Graph
The XY Function Plot can be used to easily plot vertical lines in a graph. A vertical line can be plotted as a function of the form X = F(Y) = C, where C is a constant value.
This example will demonstrate plotting two vertical lines on the step plot.grf sample file and adding a fill between the plots.
Creating XY Function Plots
The following process demonstrates how to create two vertical lines with XY function plots.
- Click the File | Open command.
- In the Open dialog, select the step plot.grf sample file and click OK. The step plot sample file is located at C:\Program Files\Grapher\Samples\step plot.grf by default.
- Select Graph 1 in the Object Manager.
- Click the Graph Tools | Add to Graph | Plot command.
- From the list, select Function Plot - X = F(Y).
- Click OK in the Choose Axes dialog.
- Select Function Plot 1 in the Object Manager.
- Click the Plot tab in the Property Manager.
- In Plot Options, change X = F(Y) = to 8.
- Click the Data Limits tab in the Property Manager.
- Change the Y minimum to 0.
- Click Yes in the Grapher Preview Warning dialog.
- Change the Last value to 180 (the Y axis maximum).
- Click the Graph Tools | Add to Graph | Plot command.
- From the list, select Function Plot - X = F(Y).
- Click OK in the Choose Axes dialog.
- Select Function Plot 2 in the Object Manager.
- Click the Plot tab in the Property Manager.
- Change the X = F(Y) = to another constant, such as 12.
- Click Yes in the Grapher Preview Warning dialog to change the Y axis limit minimum.
- Click the Data Limits tab in the Property Manager.
- Change the Y minimum to 0.
- Change the Last value to 180.
After completing the steps above, vertical lines plotted at X = 8 and X = 12 have been added to the step plot graph.
Add a Between Fill
The following steps demonstrate how to add a fill between the two XY function plots.
-
Select Graph 1 in the Object Manager.
-
Click the Fill tab in the Property Manager.
-
Click the Add button in the Add fill field. Fill 2 will be added to the Fills list.
-
In the Plot one list select Function Plot 1.
-
In the Plot two list select Function Plot 2.
-
In the Fill style section, change the Direction to Horizontal.
A between fill is added to the graph between the vertical lines. Notice by default the fill uses the same properties as the existing between fill.
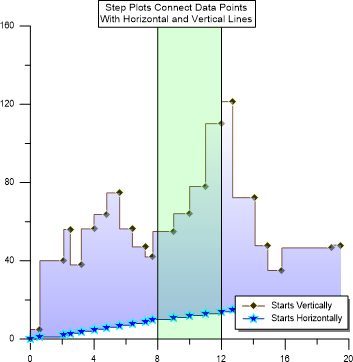
Function plots were used to create vertical lines at X=8 and X=12.